Installing Connectors from your Space
In this topic, we will focus on the general steps for installing and configuring your OAuth 2.0 connection from the spaces consumer UI.
Prerequisites
-
Before you begin, you must receive the following information from your Space administrator:
- Redirect URI from the Identity Provider (IDP) in the following format:
<Base URL>account/<Child Account ID>/oauth2/callback(For example, https://boomi.com/account/childaccount-ZF3X9U/oauth2/callback). - The base URL, company ID, client ID, and client secret for the third-party IDP. This would be required for Token generation.
- Access to the Space that has the Integrations for one or more OAuth 2.0 connectors.
- Redirect URI from the Identity Provider (IDP) in the following format:
Installing the Connector
This section describes the general steps for installing and configuring the OAuth 2.0 connection from the Spaces User view. For specific information on settings for each OAuth 2.0 Connector, refer to OAuth 2.0 configuration settings.
- Navigate to the Space you have been given access to.
- Install the connection Integration available in your space.
- Specify an Integration name and select the environments in which the Integration needs to be available.
- For each environment selected in the previous step:
- Select the process for the connection.
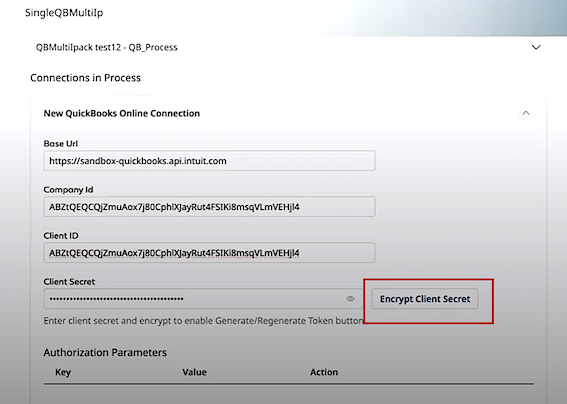
- Specify the Base URL, Company ID, Client ID, and Client Secret.
All the above information except the Client Secret will be cached and suggested to you the next time you click the input textbox.
-
Click Encrypt Client Secret. After successful encryption, the button changes to Reset Client Secret.
-
Add Authorization Parameters and Access Token Parameters. The feature includes a table for managing Key-Value pairs and associated actions for both parameters. The table contains three columns: Key, Value, and Action.
- Click the Add Property button to create a new row in the table.
- Type the desired Key and its related Value in the appropriate columns. The necessary value can be entered with no maximum character limit.
- To remove any unnecessary parameters, click the Delete button in the Action column.
-
Click the Generate token button.
noteThis button activates only after encrypting the client secret.
A pop-up message appears notifying that the IDP would open in a new tab. The pop-up status changes to Initializing OAuth Token as Boomi initiates token generation with the third-party application.
-
In the IDP that opens in a new tab, log in using your credentials. In the landing page, choose Connect to continue with the token generation process.
-
Click Continue. If you have a single company, you will be redirected to the IDP dashboard. If there are multiple companies to choose from, you will be presented with a company selection option and then redirected to the dashboard.
-
On successful token generation, you will receive a confirmation message, post which the status of the Generate Token button changes to Regenerate Token.
note- If token generation fails, you'll get an error message indicating that the authorization code was not received, and access was denied.
- Tokens expire after 30 minutes and you'll need to generate a new one using the Regenerate Token button.
- The system persists the last status of the Generate Token button when editing an Ipack. You will see Re-Generate Token after generating an access token, and this status remains visible upon refreshing the connection configuration page.
-
If the JWT token expires, you will be notified of an unauthorized access error, requiring you to refresh the page and repeat the process to generate a new token.
